Zimbra Collaboration
Zimbra from A-Z
Simply explained – easy to find.
teuto.net offers with Zimbra Groupware a cost-effective groupware solution hosted exclusively in Germany for your company. On this page you will find information about configuration and operation of Zimbra.
Information about the Zimbra packages and prices can be found under products and services.
Configurationen
blank
Your content goes here. Edit or remove this text inline or in the module Content settings. You can also style every aspect of this content in the module Design settings and even apply custom CSS to this text in the module Advanced settings.
ActiveSync Configuration for Android
Here you can find the detailed instructions in English for for Andriod.
Die wichtigsten Punkte haben wir hier für sie übersetzt und zusammengefasst:
Sie konfigurieren Zimbra genau wie ein Microsoft Exchange-Konto auf Ihrem mobilen Gerät (dies ist der Name, der für jeden ActiveSync-basierten Dienst verwendet wird. Um diese Einrichtung abzuschließen, müssen Sie Folgendes wissen:
Deine E-Mail-Adresse
Ihr E-Mail-Passwort
Die Domäne Ihres Unternehmens, die Sie normalerweise im Webbrowser eingeben (z.B. mail.example.com).
_______________________________________________
1) Installation und Einrichtung
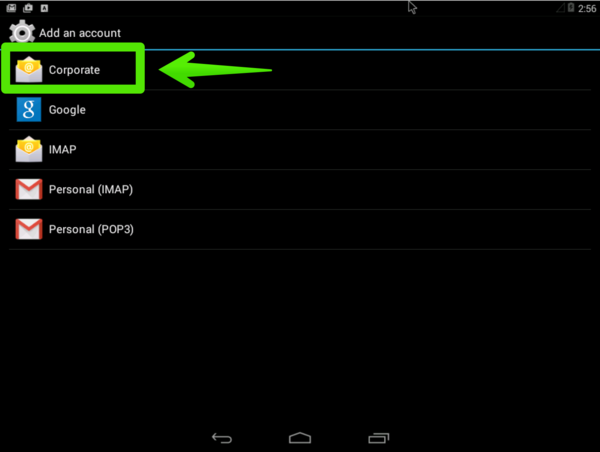
Tippen Sie auf Ihrem Android Home Bildschirm auf die Schaltfläche Anwendungen und gehen Sie dann auf das Symbol Einstellungen.

Tippen Sie im Bereich Konten auf “Konto hinzufügen/add account”

Hinweis: Nachdem Sie den Installationsprozess durchgeführt haben und Ihr Zimbra-Konto installiert ist, wird es auf diesem Bildschirm angezeigt und Sie können das Konto von hier aus bearbeiten.
Wählen Sie die Optionen “Firmenkonto/ corporate accout” aus.
Geben Sie Ihre E-Mail-Adresse und Ihr Passwort ein, um ein Konto hinzuzufügen:
E-Mail-Adresse. Dies ist Ihre Firmen-E-Mail-Adresse
Passwort. Dies ist Ihr Zimbra-Passwort, das das gleiche ist, das auch für den Zimbra Web Client verwendet wird.
Klicken Sie auf Weiter.

Wählen Sie die Option “Exchange” aus

2) Servereinstellungen
Geben Sie die Servereinstellungen ein.
Benutzername. Dies ist das E-Mail-Konto Ihres Unternehmens.
Passwort. Dies ist Ihr Passwort, das Sie für die Anmeldung im Zimbra Web Client verwenden.
Server: zimbra.teuto.net.
Klicken Sie auf Weiter.
3) Konfigurieren Sie die Optionen Ihres E-Mail-Kontos.
Häufigkeit der Posteingangsprüfung
Zu synchronisierende Daten
Benachrichtigen Sie mich, wenn E-Mails ankommen.
Kontakte von diesem Konto synchronisieren
Kalender von diesem Konto aus synchronisieren
E-Mail mit diesem Konto synchronisieren
Laden Sie Anhänge automatisch herunter, wenn Sie mit Wi-Fi verbunden sind.

Klicken Sie auf “Weiter”.
Die Account-Einrichtung ist abgeschlossen. Sie können diesem Konto optional einen Namen geben. Klicken Sie auf “beenden”
Nachdem Ihr Konto vollständig eingerichtet ist, können Sie auf Ihre E-Mails auf dem Andriod Home Screen auf das E-Mail-Symbol zugreifen.
Apple E-Mail Configuration
1.Email Daten
Um eine neues E-Mail-Konto in Apple Mail einzutragen klicken Sie bitte im Menü auf Mail > Einstellungen…
Und dann unten links auf das + Symbol.
Geben Sie Ihren Namen in das Textfeld ein. Dieser Name erscheint bei Ihren E-Mails im Absender-Feld. Die meisten Nutzer tragen hier ihren Vor- und Nachnamen ein, Sie können jedoch zum Beispiel auch einen Spitznamen verwenden.
Tragen Sie nun Ihre vollständige E-Mail-Adresse und Ihr E-Mail Kennwort ein.

Klicken Sie auf Fortfahren
_______________________________________________
2.Server für eintreffende E-Mails
Auf der folgenden Seite tragen Sie die Zugangsdaten, die Sie von uns erhalten haben, ein.
Der Zimbra-Posteingangsserver ist unter zimbra.teuto.net zu erreichen.
Geben Sie als Benutzernamen Ihre E-Mail Adresse und das dazugehörige Passwort ein.

Klicken Sie auf Fortfahren.
_______________________________________________
3.Sicherheit für eintreffende E-Mails
Hacken Sie “SSL verwenden” an.
Und wählen Sie bei Identifizierung “Kennwort” aus.

Klicken Sie auf Fortfahren.
_______________________________________________
4.Server für ausgehende E-Mails
Der Zimbra-Postausgangsserver ist unter zimbra.teuto.net zu erreichen.
Geben Sie als Benutzernamen Ihre E-Mail Adresse und das dazugehörige Passwort ein.

Klicken Sie auf Fortfahren.
_______________________________________________
5.Sicherheit für ausgehende E-Mails
Hacken Sie “SSL verwenden” an.
Und wählen Sie bei Identifizierung “Kennwort” aus.

Klicken Sie auf Fortfahren.
_______________________________________________
6.Account Zusammenfassung
Zum Schluss sehen Sie eine Zusammenfassung Ihrer eingegebenen Daten.
Hacken Sie “Account online schalten” an. Und klicken Sie auf Erstellen, um die Einrichtung fertig zu stellen.

iPhone & iPad E-mail Configuration
Name: the recipient
E-Mail: Your E-Mail-Adress
Passwort: Your Keyword
Description: Account-Name on the iPhone
Then click on Continue/ Weiter in the top right-hand corner. Now you can configure the e-mail address. and now store the most important server information.
![]()
Name: Prefilled from the step before.
E-Mail: Prefilled from the step before. Description: Prefilled from the step before.
Server for incoming e-mails
Hostname: zimbra.teuto.net
Benutzername: E-Mail-Adress
Password: your keyword
Server for outgoing e-mails
Hostname: zimbra.teuto.net
Username: E-Mail-Adress
Password: your keyword

![]()
Click Save/ Sichern in the upper right corner. The account setting check starts. If the check is successful, blue check marks are displayed on the right side and the window closes.
The configuration is complete.
Mac OSX and Zimbra
Outlook E-mail Configuration via Connector
To use your Zimbra account with Microsoft Outlook, you must first download the Zimbra Connector.
You are currently viewing a placeholder content from Default. To access the actual content, click the button below. Please note that doing so will share data with third-party providers.
To find out whether you need the x64 or x86 version, type “Control Panel7 Systemsteuerung” in the search box, (Windows + S), and behind Mail there is either 32-bit or 64-bit.
______________________________________________
2) Installation of the ZimbraConnectors
In the first installation window you can simply click on “Next/ Weiter“.
In the second step, activate the option “I accept the terms of the license agreement/ «Ich akzeptiere die Bedingungen der Lizenzvereinbarung»” and then click “Next/ Weiter” and then click “Next/ Weiter” again.
The installation will start immediately.
Click on “Close/ Schliessen” to complete the installation.
_______________________________________________
3) E-Mail Set-Up
Click on “Email accounts/E-Mail Konten”

Click on «New/ Neu», and «Add account/ Konto hinzufügen»-chosse «Others/ Andere», «Zimbra Collaboration Server»
and click on «Next/ Weiter»

_______________________________________________
4) Server
On the following page, enter the access data that you have received from us. The Zimbra incoming mail server can be reached at zimbra.teuto.net, the outgoing mail server has the name zimbra.teuto.net
Then click on “Next/ Weiter.”

Thunderbird E-mail Configuration
1. E-mail Daten
Um eine neues E-Mail-Konto in Thunderbird einzutragen klicken Sie bitte im Menü auf Datei > Neu > Existierendes E-Mail-Konto…
Geben Sie Ihren Namen in das Textfeld ein. Dieser Name erscheint bei Ihren E-Mails im Absender-Feld. Die meisten Nutzer tragen hier ihren Vor- und Nachnamen ein, Sie können jedoch zum Beispiel auch einen Spitznamen verwenden.
Tragen Sie nun Ihre vollständige E-Mail-Adresse und Ihr E-Mail Kennwort ein.

Klicken Sie auf weiter.
_____________________________________________
2.Server Daten
Thunderbrid versucht nun die Serverdaten automatisch zu ermitteln.
Die ermittelten Server daten sind leider nicht korrekt.
Bitte klicken unten links auf “Manuell bearbeiten”.

_____________________________________________
3.Server Daten eingeben
Auf der folgenden Seite tragen Sie die Zugangsdaten, die Sie von uns erhalten haben, ein. Der Zimbra-Posteingangsserver ist unter zimbra.teuto.net zu erreichen, der Postausgangsserver hat den Namen zimbra.teuto.net.
Geben Sie als Benutzernamen Ihre E-Mail Adresse ein.
Klicken Sie auf Konto erstellen.

Webinterface Zimbra
Windows 10 Mail App Configuration
1) Email
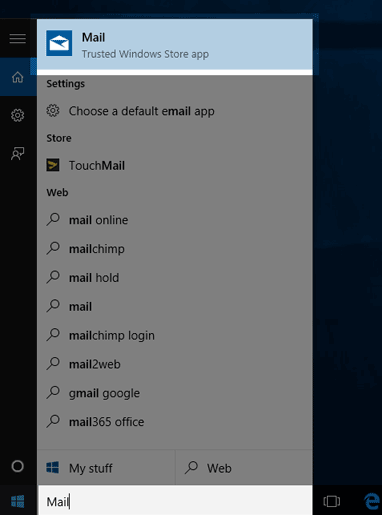
Type Mail in the search bar next to the Start menu. Choose the Mail icon that appears in the search results.
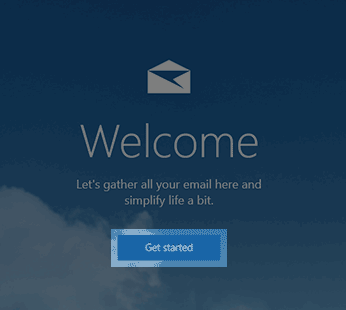
There are two ways to add an e-mail account in Windows 10. If the mail has not yet been set up, you will see a welcome window. If the mail is already set up, you’ll have access to the mail settings to create a new account.
If no mail has been set up yet
– Chosse “Get Started”
– Choose/ ad “new account/ Konto hinzufügen”

If a mail has already been set up.
– Select the Settings icon (the gear at the bottom of the screen).
![]()
– On the right side of the mail window the settings area opens. Select Accounts.

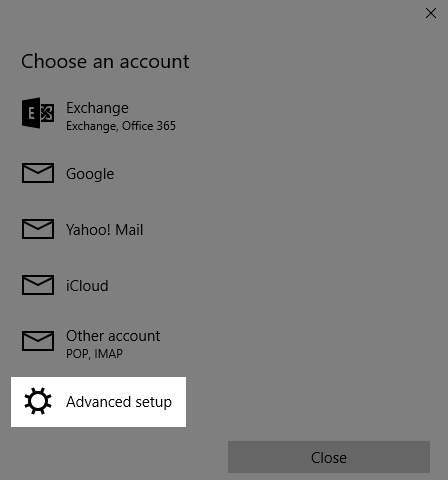
– Choose Add Account
The account has been created and now we will make the settings for Zimbra.
_______________________________________________
2) Zimbra Configuration
– On the new account screen, click Advanced Setup.
– Choose Internet-E-Mail
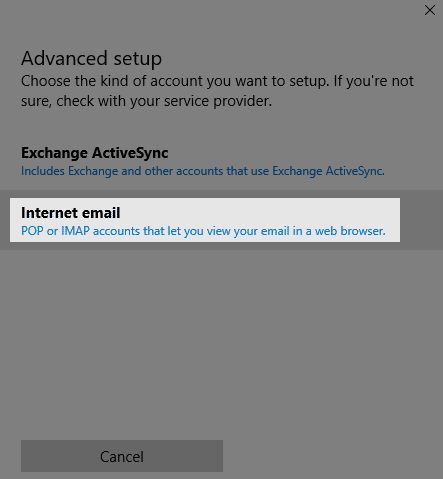
Account name: your name:
Incoming mail server: zimbra.teuto.net
type of account: IMAP4
User name: Enter the full e-mail address for the account you created
Password: the password for the email account you create.
Outgoing (SMTP) E-Mail-Server: zimbra.teuto.net
Outgoing server requires authentication is enabled.
Use the same username and password to select the check box for sending and receiving e-mail.
SSL required for incoming email is enabled.
SSL required for outgoing email is enabled.
– Select the Login check box at the bottom of the screen.
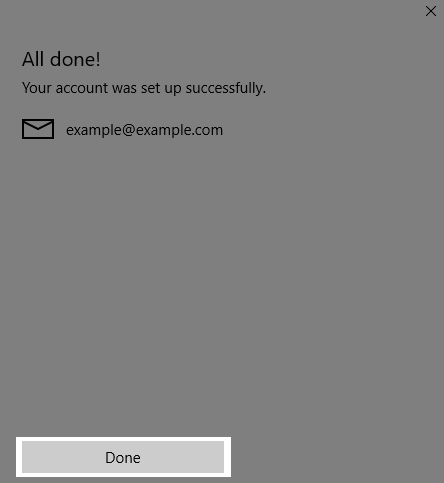
– On the Finished/ All Done screen, click
Frequently asked questions (FAQ`s)
Ihr Titel geht hier
Your content goes here. Edit or remove this text inline or in the module Content settings. You can also style every aspect of this content in the module Design settings and even apply custom CSS to this text in the module Advanced settings.
How to preview the email?
In the tab E-mail you have to select the item Message for message display as:.

How do I share a calendar?

_______________________________________________
Internal User
For internal users, you can define which rights the accessing user should have. Either no rights, read-only authorization or full authorization (manager). You can also specify a group (distribution list). All members of this group can access the shared calendar.

_______________________________________________
External user
For external users, you must enter the email address of the user and a password. External users get read-only access.

How do I remove a share from my calendar?

_______________________________________________
There you get an overview of the current releases. Click Withdraw/ Entziehen for the share you want to remove.

How do I access a shared calendar?
At the top of the email there are buttons to accept or reject the release.
If you accept the share, the calendar automatically appears in the calendar view.

_______________________________________________
If you have not received a notification, you can also create the calendar manually. To do this, go to the calendar view.
Right-click on the Calendar heading on the left side (above the existing calendars).
There select “link to shared calendar/ Link zu freigegebenem Kalender “.

_______________________________________________
First you have to enter the email address of the calendar owner.
At Path you have to enter the name of the calendar, in the default case this is “Calendar” (otherwise you have to ask for the name).
At Name any name for the calendar can be given. Under this name the calendar appears in the overview.
You can also choose a color to distinguish the dates of the different calendars.

How can I change my password?
Click on the Change button under Change Password/ Passwort ändern.
You will then be asked to enter your old and new password.

How can I retrieve additional POP3 accounts?
Note: The POP3 accounts are not automatically retrieved in the current version, you have to explicitly click the Retrieve POP Accounts button in the web interface.
Also, existing filter rules are not applied to emails from POP3 accounts.

To retrieve a POP3 account, first go to Options/ Optionen and then to POP Accounts/ POP Konten.
Click Add/ Hinzufügen at the bottom of the page.
First enter any account name.
Next, you can select the folder where the emails will be stored.
Then you can choose whether the emails should remain on the server after downloading or be deleted from there.
Next you need to specify the data of the POP3 account.
Once you have done this, you can check the account settings.
You can also create a new identity and choose when to use it.
Why are my folders not displayed under Thunderbird?

________________________________________________
There you will see an overview of your email folders.
Check all the folders that you want to be displayed and then click OK.

Why does Outlook not start anymore after uninstalling the connector?
Click on the first item mail accounts/ E-Mail-Konten… and there select View or edit existing e-mail accounts/ Vorhandene E-Mail-Konten anzeigen oder bearbeiten.
At the bottom of the Email Accounts configuration you can create a new Outlook data file/ Neue Outlook-Datendatei or open an existing one.
Select Personal folders (.pst) for Office Outlook/ Persönliche Ordner (.pst) für Office Outlook and confirm with OK.
You can then either select an existing one ( default: Outlook.pst ) or enter a new name.
Finally, you can select whether the file should be encrypted and assign a password.
When the process is complete, you will return to the E-mail Accounts/ E-Mail-Konten window. Under Send new messages to/ Neue Nachrichten übermitteln an: select the file you just created.
Now you can start Outlook again.
Downloads
Ihr Titel geht hier
Your content goes here. Edit or remove this text inline or in the module Content settings. You can also style every aspect of this content in the module Design settings and even apply custom CSS to this text in the module Advanced settings.
Zimbra Outlook Connector
Please download the Outlook Connector directly from the official Zimbra website
https://www.zimbra.com/downloads/zimbra-connector-for-outlook/
Usage from Zimbra with Outlook
Guided tour Outlook Import Wizards
Guides Tour Outlook Connectors